Knitting The Herringbone Stitch
- Sönna Schuttner
- Mar 27, 2022
- 5 min read
Updated: Sep 27, 2024
This post contains NO affiliate links or adds. However if you want to support my work,
feel free to fuel me with a kofi.
Life always picks up speed for me in the spring and I enjoy having something on my needles that is mostly mindless, still offers a bit of interest by changing up the stitch pattern every now and again, and brings in some beauty (I love spring but this time of year, the snow melts and all around me are the dead bodies of last summer's plants - and lets face it, they are not pretty). Knitting the herringbone stitch in The Freia Shawl is offers me this balance of mindless stitching and interest in the pattern before me while upping the pretty factor of my surroundings.
Jump to:
Learn the basics of knitting the herringbone stitch while making a simple but beautiful shawl. Get your copy of the Freia Shawl Pattern now!


I have a love/hate relationship with herringbone stitch. I LOVE the fabric it creates, and I can really get into the rhythm of working it. But it sure does seem to take me a long time to do (I think I stop regularly to admire the fabric I'm creating!) and it is a tad awkward to have such small yarn on such large needles. But that fabric is so worth all the awkward.
I have been wearing my Freia Shawl quite a bit recently and playing about with the herringbone stitch in another design and I want to share some of my observations and a quick tutorial for anyone who would like to try it out.
Before we dive into the mechanics of the herringbone stitch, lets first go over a few Important Things to Remember when knitting the herringbone stitch:
Herringbone in the round is a bit different than herringbone in worked flat but the basic concept is the same. This tutorial is focused on the herringbone stitch when working flat.
Herringbone is TIGHT. For example, knit in fingering weight yarn, Freia Shawl suggests a US 6/ 4mm needle to be used for the stockinette portion. The herringbone section requires a US 10.5/ 6.5mm needle! It seems so crazy to be working with big honkin' needles and fingering weight yarn! It's true. But because of extreme slant to the stitches, you will find that the stockinette still puckers where the two fabrics meet unless aggressively blocked.
It can be tricky if we make a mistake, there are few options but to go back and fix it if we are more than just one row above. And tinking herringbone is a pain in the bum-tooshy. While I will not be demonstrating tinking herringbone or fixing it in this tutorial, rest assured both are possible and you can count on a future blog post about them.
Because of #3 we just read about, adding a life line every few rows isn't a bad idea. Just be sure you use a yarn that will not felt or leave dye on your project such as undyed cotton or even kitchen twine.
There is a fantastic flip side of the tricky to fix bit in number 3: due to the nature of the stitch, you will never drop a stitch and have it run away from you deep into all your hard work. If you drop a herringbone stitch it just hangs out there, abandoned and waiting for you to return to it and make it right. Or, perhaps as I have been known to do, let it be. Maybe it didn't want to get worked in with its neighbor and who am I to force them to play together nicely? That is a pretty way of saying sometimes I just leave it and make a stitch later where it wont show (shhhh-don't tell anyone).
The craft of knitting does not have a very diverse vocabulary and we will talk about causing a stitch to lean to the right in the same sentence with the right side of the fabric. I can get turned around because one is an adverb or a direction ( "the stitch leans to the right") and one is a noun ("right side of the fabric"). Being aware of this potential point of confusion can help sort things out when needed.
Okay then! Are you ready? First I'll share the basic idea of what we do to create the herringbone stitch and then I'll show you some pictures and we will break down each step.

To get those right and left leaning stitches, we work two stitches together (imagine knitting two together in your mind) but then we only drop the front stitch off the needle (can you see it in your imagination?). The different directions that the stitches lean are dependent on how they are worked together.
Lets reflect on what we know of working a right leaning decrease with a k2tog (knit 2 together) or p2tog (purl two together) and put it together with our experience of working a left leaning decrease by doing the same actions through the back loop. We take advantage of that right and left lean created with these decreases but we prevent the actual decrease from happening when we only drop one stitch off the needle. And that last bit right there is where all the magic is.
Shall I find another way to say that last bit again? no! haha okay then - on to the tutorial:
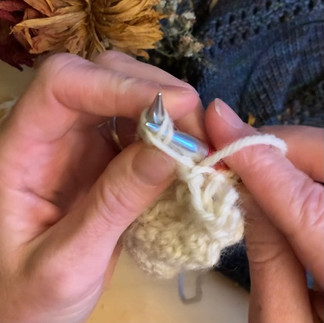
Photo Tutorial:
The following images demonstrate the mechanics of creating the RIGHT leaning legs of the herringbone fabric: when working herringbone flat and when we want the stitch to lean to the the right, we knit (from the right side) or purl (from the wrong side) two together through the front loop just as we would when instructed to k2tog or p2tog. EXCEPT! Remember the magic part? We only push the first of the two stitches we worked together off the left needle.


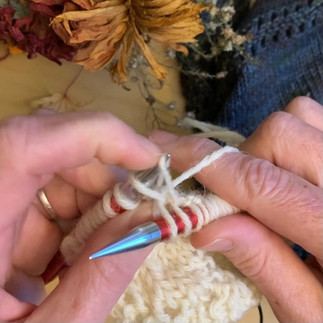
To get that stitch to lean towards the LEFT, we have to work through the back loop. (Don't you wish italics could also lean left for this paragraph?) From the right side we will k2tog through the back loop and from the wrong side we will p2tog through the back loop. Just as in the right leaning herringbone stitch, we will only drop (or push) the first stitch of the two we worked together off the left needle. We rarely need to use the p2tog through the back loop - its quite awkward to do and is much easier to get that left lean from the front side by k2tog tbl, but its good to know we can make use of it if needed. In the third picture below, you can clearly see the stitch I have just dropped off the needle leaning to the left and his buddy that he had been worked together with still hanging out on the left needle.


The basic concept of knitting the herringbone stitch:
work two stitches together without decreasing. When creating herringbone fabric by working rows back and forth - flat - we will use the following rhythm:
Row 1 (right side): k2tog but only drop one stitch off the left needle, repeat to the end of the row, slip the last awkward partially worked stitch to the right needle, turn work
Row2 (wrong side): p2tog but only drop one stitch off the left needle, repeat to the end of the row, slip that last awkward partially worked stitch to the right needle, turn work
I will have a whole blog post about those awkward partially worked stitches coming up soon and we will chat about how to work herringbone in the round.
Knitting The Herringbone Stitch
Until next time, Happy Making my dear Maker Friends!
~Sönna
Like what you find here?
Tap that "Sign Up" at the top of this page for blog post updates!
Support my work:
Thanks for the tip about bigger needles- I haven’t tried herringbone stitch yet, though I find it intriguing, and I fear I would have learned the hard wa!